Saturday, 2 November 2019

Working with Ajax and Spring MVC

Working with Ajax and Spring MVC

Simple example for ajax call or form posting using spring mvc as below.

Validation using Ajax call:

Ajax call:

$.ajax({
url: "your-application-url",
type:"POST",
success: function(result){
if(result!=null){
//do Operation 
}else{
//do else Operation 
}
}
});


Spring mvc :

@ResponseBody
@RequestMapping(value = your-app-url, method = RequestMethod.POST)
protected String validatefunction(@RequestParam String param) {
try {
//Do operation
}
catch (Exception e) {
}
return null;
}

Form Posting using Ajax:

Ajax call:

$.ajax({
type: "POST",
url: "application-post-url",
data: $("#editForm").serialize(),
    success: function(data){
data = JSON.parse(data);
if(data !=null){
//do operation
}
}
});

Spring mvc:

@RequestMapping(value = "app-post-url", method = RequestMethod.POST)
public @ResponseBody String save(@ModelAttribute("user") @Validated 
                User dto, BindingResult result) {
try {
//do operation
         }
    catch (Exception e) {
        }
JSONObject jsonObj = new JSONObject();
jsonObj.put("key", "value");
        return jsonObj.toString();
}


Alert function in JS:

Basic alert with confirmation button:

swal({
title: '<spring:message code="message.main.property"/>',
icon: "warning",
buttons: ["<spring:message code='message.cancel'/>","<spring:message code='message.confirm'/>"],
dangerMode: true,
})
.then(function(isclick) {
  if (isclick) {
  //do operation - call ajax or url redirect
  }
});

Form Post based on on-click:

$(document).on('click', '.btnClassId', function (e) {
$('#editForm').attr('action', '${pageContext.request.contextPath}/app-url');
$('#editForm').submit();
});


Redirection to the specified url:

window.location.href="${pageContext.request.contextPath}/application-url";


Wednesday, 30 October 2019

Useful Ubuntu Commands

               Useful Repeatedly used Ubuntu Commands :


To connect to the linux machine using putty

Configure the public ip and click open as shown in the below image, then you will be prompted username and password credentials to enter. Once that is done you will be redirected to home page.


To do ssh after login:

ssh user@yourIp
ex: root@192.xx.1.xx

To start and stop the Apache-tomcat server:

sudo sh startup.sh
sudo sh shutdown.sh

To Copy files from one location to other:

sudo cp src dest

To do secure copy:

sudo scp src dest

To Copy files from one location to other recursivley:

sudo cp -r src dest

To move files from one location to other

sudo mv -i src dest

To check ubuntu version in terminal:

lsb_release -d;

To get additional details
lsb_release -a;

To check Java version

 java -version;

To get java installed path:
file `which java javac`;

To Work with vi editors

sudo vi fileName.txt 

To Jump to last line of file
SHIFT+G 

To Edit the file
Press I

To save file without changes
 ESC : 
 SHIFT + Q! 

To Save File with Changes
 ESC : 
 SHIFT + WQ 

To Search the content
 ESC:
 ?content , then hit enter 
 n - to search back ward 
 N - to search forward 


Friday, 25 October 2019

Install and enable SSL certification for free of cost

Enabling SSL Certification to Web or Static Application:


We may all come across the scenario like how to enable the ssl certificate to your web application.
For this there are several service providers are available based on the security level. If you are new to ssl certification and just want to try to install without any cost, Let’s Encrypt is the best option, Since they will provide certificate without any cost. 


Nowadays you can find multiple service providers for less cost as well. Some of them are listed below, You can take a look.  SSL Certificates , Name Cheap , SSL Guru etc.


Installing SSL Certificate through Let's Encrypt to your public machine:

Go to the Let’s Encrypt and click Get Started   or  Directly hit this link Get Started.

You can install the certificate using two ways, With & Without Shell Access, I use to prefer With Shell Access using Certbot ACME client. 


You can choose the certificate for which machine you are going to install from the below link
Instructions .

Once you click on the above link you will be prompt with software selection list to which you need to install,


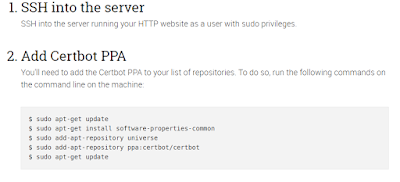
After selecting appropriate Software and machine from the selection list you will prompt with details of command to execute which will install certificate in your machine as shown in the below image.


After executing all the commands which is listed in the browser with sudo user, Certificate will be installed in to your server machine.

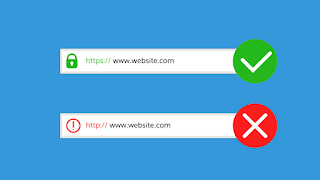
Now you can access the application from browser you can able to see that application will be appended with https:

Some time https will not be appended with browser url until we force set it, To set it do the following changes.
1. login to  the linux/ubuntu, navigate to /etc/apache2/sites-available 
2. You can find file 000-default.conf which is listed under the above folder location, add the below          lines by changing domain name to your domain name before the end of VirtualHost.
  ServerName yourdomain.com
  Alias www.yourdomain.com
  Redirect permanent / https://www.yourdomain.com/\     
   

That's all, Now you can browse your domain, It will always amended with https:


Wednesday, 23 October 2019

Useful Information related to MySQL and Oracle database:

Useful Information related to MySQL and Oracle database:

This post covers the information related to mysql/oracle database.


How to drop all tables in database:

There are many alternatives were already existing to delete all the tables of schema in oracle as well as mysql. This post is to demonstrate how to achieve this with sql command.

Using Oracle: 

  • Connect or login into your respective schema with credentials and execute below query to list out all the tables exists in current schema.
                SELECT 'DROP TABLE "' || TABLE_NAME || '" CASCADE CONSTRAINTS;' FROM user_tables;
  • Above query will result list of sql drop down statements, Copy all those and execute to delete all the tables permanently.

Using Mysql:

  • Connect or login into your respective schema with credentials and execute below query to list out all the tables exists in current schema.
      SELECT CONCAT("DROP TABLE `",table_name,"`;") FROM information_schema.tables WHERE table_schema = 'camelone';

  • Above query will result list of sql dropdown statements, Copy all those and execute to delete all the tables permanently before that make sure you set the foreign key checks to 0 or disable using below query.
            SET FOREIGN_KEY_CHECKS = 0;

How to check table space list in Oracle:

We can use the below query to list out all the table space of database in oracle.

   SELECT TABLESPACE_NAME "TABLESPACE",
   INITIAL_EXTENT "INITIAL_EXT",
   NEXT_EXTENT "NEXT_EXT",
   MIN_EXTENTS "MIN_EXT",
   MAX_EXTENTS "MAX_EXT",
   PCT_INCREASE
   FROM DBA_TABLESPACES;


To drop table space in Oracle:

If we want to delete table space, Use the below query
   DROP TABLESPACE CAMELONE_CORE_TS 
    INCLUDING CONTENTS 
    CASCADE CONSTRAINTS;

To restore dump to MySQL database using command prompt:

If you want to restore the dump file using  using command line use the below query.
  mysql -u username -p database_name < filename.sql


To restore dump in Oracle using any oracle support tool

@your local path pointing to the dump file
For ex: @D:\my-dump.sql

To Rename table from lower case to Upper Case:

SELECT distinct CONCAT('RENAME TABLE ', TABLE_NAME, ' TO ' , UPPER(TABLE_NAME), ';') FROM INFORMATION_SCHEMA.COLUMNS WHERE TABLE_SCHEMA = 'camelone';


To Set SQL Safe Update:

SET SQL_SAFE_UPDATES = 0;


To Check the table reference:

Select table_name
from information_schema.KEY_COLUMN_USAGE
where table_schema = 'camelone'
and referenced_table_name = 'T_CORE_URI';


To Change the Port of Oracle XE:

Exec DBMS_XDB.SETHTTPPORT(3010);


 To Set Max Allowed Packet in MySql:

show variables like 'max_allowed_packet';
SET GLOBAL max_allowed_packet=1024*1024*1024; 
SET SESSION max_allowed_packet=1024*1024*1024; 


Data Source Configuration in Web Server - Apache tomcat:

While working with Web application and Apache tomcat as server, To connect and point to the database like mysql or oracle, Data source configuration in context file of application server is one of the best option.

You can find the context.file under the config folder of apache tomcat and place the below code between the context elements.

For MySQL:

<Resource acquireRetryAttempts="30" auth="Container" checkoutTimeout="180000" driverClass="com.mysql.jdbc.Driver" factory="org.apache.naming.factory.BeanFactory" idleConnectionTestPeriod="300" initialPoolSize="8" jdbcUrl="jdbc:mysql://localhost:3306/SchemaName" maxIdleTime="0" maxPoolSize="10" name="jdbc/SchemaName" password="password" preferredTestQuery="select 1" type="com.mchange.v2.c3p0.ComboPooledDataSource" user="root"/>

Note: Replace SchemaName with your schema name or instance name along with user as well as password.


For Oracle:

<Resource accessToUnderlyingConnectionAllowed="true" auth="Container" connectionProperties="SetBigStringTryClob=true" driverClassName="oracle.jdbc.OracleDriver" logAbandoned="true" maxActive="2" maxIdle="1" maxTotal="3" maxWait="1" maxWaitMillis="10000" name="jdbc/schema-name" password="password" removeAbandoned="true" removeAbandonedTimeout="90" type="javax.sql.DataSource" url="jdbc:oracle:thin:@localhost:1521/DataBaseName" username="SchemaName"/>


Note: Replace SchemaName with your schema name or instance name, DataBaseName to your installed data base name.
                        

To drop and create users in Oracle using command prompt:

alter session set "_ORACLE_SCRIPT"=true;  
drop user camelone cascade;
create tablespace CAMELONE_CORE_TS DATAFILE 'temp_core.dat' SIZE 100M REUSE AUTOEXTEND ON;
create user camelone identified by password default tablespace CAMELONE_CORE_TS;
grant dba,connect,resource to camelone;


Monday, 21 October 2019

Migrating from MySQL version 7 to 8

MySQL Migration from version 7 to version 8:


Here is the simple and few steps which we need to follow to migrate to higher version or latest version.


Step 1: We need to set the timezone in hibernate database configuration file as below:

  ?useUnicode=true&useJDBCCompliantTimezoneShift=true&useLegacyDatetimeCode=false&serverTimezone=UTC


Note:

In Case if you are working with xml file replace & symbol by &amp

Step 2: If you are working with spring mvc, Set the dependency in pom.xml

 <dependency>
    <groupId>mysql</groupId>
    <artifactId>mysql-connector-java</artifactId>
    <version>8.0.12</version>
</dependency>

Oracle Database Installation in Local Environment

Steps to Setup Oracle Database Software Installation :


  1. Download the software from Oracle website. Click Here

  2. Once the download is complete means proceed for installation. For reference use the link: Click Here

  3. Create table-space, schema using command prompt

  4. Login Into The Database Using Default Username And Password Which You Given During
     Installation.
    • Create Table Space Using Command : Create Tablespace TS_NAME DATAFILE 'Temp_core.Dat' SIZE 100M REUSE AUTOEXTEND ON;
    • Create User Using Command: Create User Camelone Identified By Password Default Tablespace TS_NAME;
    • Grant Role And Permission To The User : Grant Dba,Connect,Resource To Camelone;

  5. Once the installation is done, use the third part tool or database connector like Oracle SQL
      Developer link or PLSQL connector to connect to the database.

Multi language support in web application running with MySQL data base

How to support web application to accommodate any language which is running with MySQL?

To support any web application which will get the user input data with any language which will log into data base and same data can be view back to the  user, To achieve this UTF-8 is best way to do it.

Find the some of the steps below to achieve that to support UTF-8 using mysql database.


Configuration changes in MySql database:

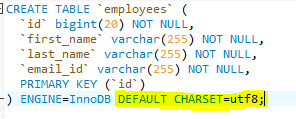
  • While Creating Table Make Sure The Table Characterset Should Be Configured With UTF-8.
Table default character set


  • While Creating Table Make Sure The Table Characterset Should Be Configured With UTF-8.


  • Configure The Utf-8 Encoding In Jndi Configuration Of Mysql. If You Are Using Apachi Tomcat, You Can Find The Finguration Under Context.Xml Followed By Schema Name


  • In Case If You Are Working With Web Application To Enable UTF-8, Configure The Force Encoding Of All Incoming Request In Web.Xml.


  • To Support Multi language Search In Data Table, Do The Below Configuration In Tomcat  Server Of server.xml File


Supporting Multi Language For Any Web Application Running With Oracle Database

How to support Multi-language in Oracle ?


We may all come across the situation of how to support Multi language in Oracle while working with web application. For that UTF-8 is the best way to do that. 

Here is the steps which I followed to achieve for capturing multiple language into Oracle data base as well as view the same  on the UI pages.


Steps to set the default character-set to support UTF-8 in Oracle database:


  • Connect to the Oracle data base using SYS user using command prompt.
          
Fig: Login to oracle with sys user.


  • Check the character-set value of the database by using below command. 
           select * from nls_database_parameters where parameter='NLS_CHARACTERSET';

          The above command should return the result with AL32UTF8. If not means we need to set it.  
          
           
Character-set utf-8

  • To set the character-set to AL32UTF8, Use the below command, If already done or present by default means can skip this step.
           Update Sys.Props$ Set VALUE$='AL32UTF8' Where NAME='NLS_CHARACTERSET';

  • Restart the database using following command once the changes had been done for character-set using above step.
                      shu Immediate;
                      startup;

Steps to add/change configuration file in web application:

        Once we done with the changes to the database is not sufficient to enable or support multi language, We need to add Character Encoding Filter in configuration file of web.xml (If you are working with spring or servlet based application).

configuration file (web.xml)

Configuration in application server (Apache tomcat):

Although by following above steps we can make any application to work in multilingual (read/write/post/log to database), but to make data table view/filter, we need to configure the UTF-8 encoding in configuration file of tomcat too.

Configuration in server.xml file


 That's all. After following all the above steps, you should be able to support your web application with any language like log the data entered in any language to database, view the page data fetching from database with any stored language.


Working with Ajax and Spring MVC

Working with Ajax and Spring MVC Simple example for ajax call or form posting using spring mvc as below. Validation using Ajax call...